The Hidden Dangers of Direct API Uploads: Why Presigned URLs Are Your Best Bet
In the world of web development, handling file uploads is a common task. From profile pictures to document storage, applications frequently need to accept user-generated content. While directly uploading files through your API might seem like the simplest approach, it often introduces a host of security vulnerabilities, performance bottlenecks, and scalability headaches. This is where presigned upload URLs come into play, offering a more secure, efficient, and scalable solution.
Let's dive into why direct API uploads are harmful and why you should be embracing presigned URLs, along with best practices and how industry giants handle their file uploads.
The Pitfalls of Direct API Uploads
When you allow users to directly upload files through your backend API, you're essentially turning your server into a file processing and storage intermediary. This seemingly straightforward approach comes with several significant drawbacks:
1. Security Vulnerabilities:
DDoS Attacks and Resource Exhaustion: Large file uploads can easily overwhelm your server. Malicious actors could exploit this by initiating numerous concurrent large file uploads, leading to a Distributed Denial of Service (DDoS) attack or simply exhausting your server's memory, CPU, and network resources.
Authentication and Authorization Complexity: Your API needs to authenticate every upload request and then authorize the user to upload to a specific location. While necessary, this adds complexity and a potential attack surface if not implemented perfectly.
Exposure of Sensitive Logic: Your backend API might contain sensitive business logic or access to your database. Every direct upload request brings the user's request closer to this sensitive core, increasing the risk of exploitation.
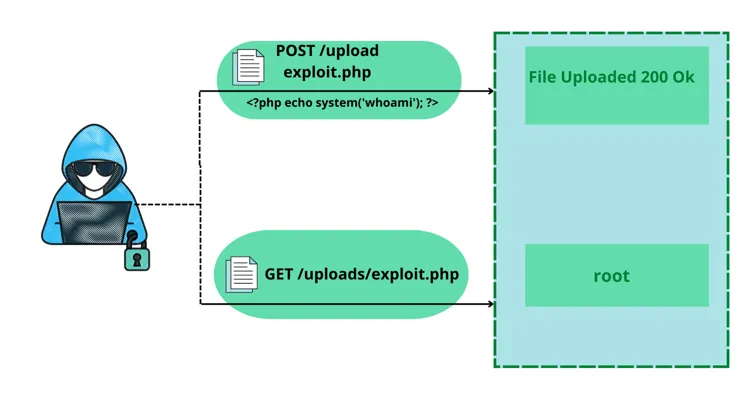
Data Validation Hell: You'll need robust server-side validation for every uploaded file (type, size, content, etc.). Poorly implemented validation can lead to malicious file uploads that exploit vulnerabilities in your application or even the underlying operating system.
Direct Access to Storage Credentials: In some less secure setups, developers might inadvertently expose storage credentials within the API, making your storage vulnerable if the API is compromised.
2. Performance Bottlenecks:
Increased Server Load: Your server has to shoulder the entire burden of receiving, processing, and then transferring the file to your permanent storage solution (e.g., S3, Azure Blob Storage). This ties up server resources that could be used for other critical API operations.
Slower Uploads for Users: The file has to travel from the user's device to your server, and then from your server to the storage service. This extra hop introduces latency, resulting in a slower upload experience for your users.
Scalability Challenges: As your user base grows and the volume of uploads increases, your backend server will quickly become a bottleneck, necessitating expensive scaling solutions (more servers, load balancers, etc.).
3. Cost Implications:
Higher Server Costs: More server resources are required to handle file uploads, leading to increased infrastructure costs.
Increased Bandwidth Usage: Your server will incur bandwidth costs for both receiving and sending the file, effectively doubling the bandwidth consumed by each upload.
The Power of Presigned Upload URLs
Presigned URLs offer a much more elegant, secure, and performant solution for file uploads. The concept is simple: your backend server, instead of handling the file directly, generates a temporary, time-limited URL that allows a user to directly upload a file to your chosen cloud storage service (like AWS S3, Google Cloud Storage, or Azure Blob Storage).
Here's how it works:
- Client Requests an Upload: The client application (e.g., web browser, mobile app) tells your backend API that it wants to upload a file.
- Backend Generates Presigned URL: Your backend API, after authenticating and authorizing the user, generates a presigned URL using its secure cloud storage credentials. This URL includes permissions for a specific action (e.g., PUT for upload), a specific file path, and an expiration time.
- Backend Returns Presigned URL: Your backend API sends this presigned URL back to the client.
- Client Uploads Directly to Storage: The client then uses the presigned URL to directly upload the file to the cloud storage service. Your backend server is completely out of the data path for the file transfer.
- Optional: Backend Notifies of Completion: Once the upload is complete, the client can optionally notify your backend API, which can then perform any post-processing, update database records, or trigger further actions.
Implementation: Generating Presigned URLs
Let's dive into practical implementations. Here are complete code examples for generating presigned URLs in popular languages and frameworks.
Node.js/TypeScript Implementation with AWS S3
First, install the AWS SDK:
npm install @aws-sdk/client-s3 @aws-sdk/s3-request-presignerHere's a complete backend implementation using Express.js:
import { S3Client, PutObjectCommand } from '@aws-sdk/client-s3';
import { getSignedUrl } from '@aws-sdk/s3-request-presigner';
import express from 'express';
import { v4 as uuidv4 } from 'uuid';

const app = express();
const s3Client = new S3Client({
  region: process.env.AWS_REGION || 'us-east-1',
  credentials: {
    accessKeyId: process.env.AWS_ACCESS_KEY_ID!,
    secretAccessKey: process.env.AWS_SECRET_ACCESS_KEY!,
  },
});

const BUCKET_NAME = process.env.S3_BUCKET_NAME!;
const MAX_FILE_SIZE = 10 * 1024 * 1024; // 10MB
const ALLOWED_MIME_TYPES = ['image/jpeg', 'image/png', 'application/pdf'];

// Generate presigned URL endpoint
app.post('/api/upload/generate-url', async (req, res) => {
  try {
    // 1. Authenticate user (implement your auth logic)
    const userId = req.user?.id;
    if (!userId) {
      return res.status(401).json({ error: 'Unauthorized' });
    }

    // 2. Validate file metadata
    const { fileName, fileType, fileSize } = req.body;

    if (!fileName || !fileType || !fileSize) {
      return res.status(400).json({ error: 'Missing required fields' });
    }

    if (fileSize > MAX_FILE_SIZE) {
      return res.status(400).json({ error: 'File size exceeds limit' });
    }

    if (!ALLOWED_MIME_TYPES.includes(fileType)) {
      return res.status(400).json({ error: 'File type not allowed' });
    }

    // 3. Generate unique object key
    const fileExtension = fileName.split('.').pop();
    const objectKey = `uploads/${userId}/${uuidv4()}.${fileExtension}`;

    // 4. Create S3 command
    const command = new PutObjectCommand({
      Bucket: BUCKET_NAME,
      Key: objectKey,
      ContentType: fileType,
      ContentLength: fileSize,
      // Add metadata
      Metadata: {
        userId: userId.toString(),
        originalFileName: fileName,
        uploadedAt: new Date().toISOString(),
      },
    });

    // 5. Generate presigned URL (expires in 15 minutes)
    const presignedUrl = await getSignedUrl(s3Client, command, {
      expiresIn: 900, // 15 minutes
    });

    // 6. Store upload record in database (optional)
    // await db.uploads.create({
    //   userId,
    //   objectKey,
    //   fileName,
    //   fileType,
    //   fileSize,
    //   status: 'pending',
    // });

    res.json({
      presignedUrl,
      objectKey,
      expiresIn: 900,
    });
  } catch (error) {
    console.error('Error generating presigned URL:', error);
    res.status(500).json({ error: 'Failed to generate upload URL' });
  }
});

// Notify backend after upload completes
app.post('/api/upload/complete', async (req, res) => {
  try {
    const { objectKey } = req.body;
    const userId = req.user?.id;

    // Verify the upload belongs to the user
    // Update database record
    // Trigger post-processing (image resizing, virus scan, etc.)

    res.json({ success: true, message: 'Upload processed' });
  } catch (error) {
    console.error('Error processing upload:', error);
    res.status(500).json({ error: 'Failed to process upload' });
  }
});
Python Implementation with boto3
For Python applications, use boto3:
import boto3
from botocore.exceptions import ClientError
from flask import Flask, request, jsonify
from datetime import timedelta
import uuid
import os

app = Flask(__name__)

# Initialize S3 client
s3_client = boto3.client(
    's3',
    aws_access_key_id=os.getenv('AWS_ACCESS_KEY_ID'),
    aws_secret_access_key=os.getenv('AWS_SECRET_ACCESS_KEY'),
    region_name=os.getenv('AWS_REGION', 'us-east-1')
)

BUCKET_NAME = os.getenv('S3_BUCKET_NAME')
MAX_FILE_SIZE = 10 * 1024 * 1024  # 10MB
ALLOWED_MIME_TYPES = ['image/jpeg', 'image/png', 'application/pdf']

@app.route('/api/upload/generate-url', methods=['POST'])
def generate_presigned_url():
    try:
        # 1. Authenticate user
        user_id = request.headers.get('X-User-ID')
        if not user_id:
            return jsonify({'error': 'Unauthorized'}), 401

        # 2. Validate request data
        data = request.get_json()
        file_name = data.get('fileName')
        file_type = data.get('fileType')
        file_size = data.get('fileSize')

        if not all([file_name, file_type, file_size]):
            return jsonify({'error': 'Missing required fields'}), 400

        if file_size > MAX_FILE_SIZE:
            return jsonify({'error': 'File size exceeds limit'}), 400

        if file_type not in ALLOWED_MIME_TYPES:
            return jsonify({'error': 'File type not allowed'}), 400

        # 3. Generate unique object key
        file_extension = file_name.split('.')[-1]
        object_key = f'uploads/{user_id}/{uuid.uuid4()}.{file_extension}'

        # 4. Generate presigned URL
        presigned_url = s3_client.generate_presigned_url(
            'put_object',
            Params={
                'Bucket': BUCKET_NAME,
                'Key': object_key,
                'ContentType': file_type,
                'ContentLength': file_size,
                'Metadata': {
                    'userId': user_id,
                    'originalFileName': file_name,
                }
            },
            ExpiresIn=900  # 15 minutes
        )

        return jsonify({
            'presignedUrl': presigned_url,
            'objectKey': object_key,
            'expiresIn': 900
        })

    except ClientError as e:
        print(f'Error generating presigned URL: {e}')
        return jsonify({'error': 'Failed to generate upload URL'}), 500
    except Exception as e:
        print(f'Unexpected error: {e}')
        return jsonify({'error': 'Internal server error'}), 500
Client-Side Upload Implementation (React/TypeScript)
Here's how to implement the client-side upload with progress tracking:
import React, { useState } from 'react';

interface UploadResponse {
  presignedUrl: string;
  objectKey: string;
  expiresIn: number;
}

const FileUpload: React.FC = () => {
  const [file, setFile] = useState<File | null>(null);
  const [uploadProgress, setUploadProgress] = useState(0);
  const [uploading, setUploading] = useState(false);
  const [error, setError] = useState<string | null>(null);

  const handleFileSelect = (e: React.ChangeEvent<HTMLInputElement>) => {
    const selectedFile = e.target.files?.[0];
    if (selectedFile) {
      // Validate file size (10MB limit)
      if (selectedFile.size > 10 * 1024 * 1024) {
        setError('File size exceeds 10MB limit');
        return;
      }
      setFile(selectedFile);
      setError(null);
    }
  };

  const uploadFile = async () => {
    if (!file) return;

    setUploading(true);
    setError(null);
    setUploadProgress(0);

    try {
      // Step 1: Request presigned URL from backend
      const response = await fetch('/api/upload/generate-url', {
        method: 'POST',
        headers: {
          'Content-Type': 'application/json',
          'Authorization': `Bearer ${getAuthToken()}`, // Your auth token
        },
        body: JSON.stringify({
          fileName: file.name,
          fileType: file.type,
          fileSize: file.size,
        }),
      });

      if (!response.ok) {
        const errorData = await response.json();
        throw new Error(errorData.error || 'Failed to get upload URL');
      }

      const { presignedUrl, objectKey }: UploadResponse = await response.json();

      // Step 2: Upload file directly to S3 using presigned URL
      const uploadResponse = await fetch(presignedUrl, {
        method: 'PUT',
        headers: {
          'Content-Type': file.type,
        },
        body: file,
      });

      if (!uploadResponse.ok) {
        throw new Error('Upload failed');
      }

      // Step 3: Notify backend that upload is complete
      await fetch('/api/upload/complete', {
        method: 'POST',
        headers: {
          'Content-Type': 'application/json',
          'Authorization': `Bearer ${getAuthToken()}`,
        },
        body: JSON.stringify({ objectKey }),
      });

      setUploadProgress(100);
      alert('Upload successful!');
      setFile(null);

    } catch (err) {
      setError(err instanceof Error ? err.message : 'Upload failed');
      setUploadProgress(0);
    } finally {
      setUploading(false);
    }
  };

  // Alternative: Upload with progress tracking using XMLHttpRequest
  const uploadWithProgress = async () => {
    if (!file) return;

    try {
      const response = await fetch('/api/upload/generate-url', {
        method: 'POST',
        headers: {
          'Content-Type': 'application/json',
          'Authorization': `Bearer ${getAuthToken()}`,
        },
        body: JSON.stringify({
          fileName: file.name,
          fileType: file.type,
          fileSize: file.size,
        }),
      });

      const { presignedUrl, objectKey } = await response.json();

      return new Promise((resolve, reject) => {
        const xhr = new XMLHttpRequest();

        xhr.upload.addEventListener('progress', (e) => {
          if (e.lengthComputable) {
            const percentComplete = (e.loaded / e.total) * 100;
            setUploadProgress(percentComplete);
          }
        });

        xhr.addEventListener('load', () => {
          if (xhr.status === 200) {
            resolve(objectKey);
          } else {
            reject(new Error('Upload failed'));
          }
        });

        xhr.addEventListener('error', () => {
          reject(new Error('Upload failed'));
        });

        xhr.open('PUT', presignedUrl);
        xhr.setRequestHeader('Content-Type', file.type);
        xhr.send(file);
      });
    } catch (err) {
      setError(err instanceof Error ? err.message : 'Upload failed');
    }
  };

  return (
    <div className="upload-container">
      <input
        type="file"
        onChange={handleFileSelect}
        accept="image/jpeg,image/png,application/pdf"
      />
      {file && (
        <div>
          <p>Selected: {file.name} ({(file.size / 1024 / 1024).toFixed(2)} MB)</p>
          <button onClick={uploadFile} disabled={uploading}>
            {uploading ? 'Uploading...' : 'Upload'}
          </button>
          {uploadProgress > 0 && (
            <div className="progress-bar">
              <div
                className="progress-fill"
                style={{ width: `${uploadProgress}%` }}
              />
            </div>
          )}
        </div>
      )}
      {error && <p className="error">{error}</p>}
    </div>
  );
};

export default FileUpload;
Error Handling and Validation
Here's a comprehensive error handling example for production use:
// Enhanced error handling middleware
const handleUploadError = (error: Error, req: Request, res: Response) => {
  console.error('Upload error:', error);

  // Handle specific AWS errors
  if (error.name === 'NoSuchBucket') {
    return res.status(500).json({
      error: 'Storage bucket not found',
      code: 'STORAGE_ERROR'
    });
  }

  if (error.name === 'InvalidAccessKeyId') {
    return res.status(500).json({
      error: 'Storage configuration error',
      code: 'CONFIG_ERROR'
    });
  }

  // Handle expired presigned URLs
  if (error.message.includes('expired')) {
    return res.status(403).json({
      error: 'Upload URL has expired. Please request a new one.',
      code: 'URL_EXPIRED'
    });
  }

  // Generic error
  return res.status(500).json({
    error: 'Upload failed. Please try again.',
    code: 'UPLOAD_FAILED'
  });
};

// Rate limiting for presigned URL generation
import rateLimit from 'express-rate-limit';

const uploadUrlLimiter = rateLimit({
  windowMs: 15 * 60 * 1000, // 15 minutes
  max: 10, // Limit each IP to 10 requests per windowMs
  message: 'Too many upload requests. Please try again later.',
  standardHeaders: true,
  legacyHeaders: false,
});

app.post('/api/upload/generate-url', uploadUrlLimiter, async (req, res) => {
  // ... existing code
});
The Advantages of Presigned URLs
1. Enhanced Security:
- No Direct Server Exposure: Your backend server is no longer directly exposed to large file uploads, significantly reducing the risk of DDoS attacks and resource exhaustion.
- Time-Limited Access: Presigned URLs expire, limiting the window of opportunity for misuse if intercepted.
- Granular Permissions: You can specify exactly what actions are allowed (e.g., only PUT for upload) and to which specific object or path.
- Decoupled Authentication: The cloud storage service handles the actual file upload authentication, using the signature provided in the presigned URL. Your server only needs to handle initial user authentication.
2. Improved Performance:
- Direct-to-Storage Uploads: Files are uploaded directly from the client to the cloud storage, bypassing your backend server entirely. This eliminates an extra hop and reduces latency.
- Offloaded Server Load: Your backend server is freed from the heavy task of handling large file transfers, allowing it to focus on core business logic and API requests.
- Optimized Network Path: Cloud providers typically have highly optimized networks for data transfer, leading to faster uploads for users.
3. Superior Scalability:
- Cloud-Native Scaling: Cloud storage services are designed to handle massive scale. They automatically manage the infrastructure required for millions of uploads, without you needing to provision or manage servers.
- Reduced Backend Resource Requirements: As your upload volume grows, your backend server's resource usage for uploads remains minimal, making it easier and cheaper to scale your application.
4. Reduced Costs:
- Lower Server Costs: Less server resources are needed for handling uploads, leading to reduced infrastructure expenses.
- Optimized Bandwidth: Bandwidth costs are often handled more efficiently by cloud storage providers for direct uploads.
Advanced Implementation Patterns
Multipart Upload for Large Files
For files larger than 5GB, use multipart uploads. Here's how to implement it:
// Node.js: Multipart upload implementation
import { S3Client, CreateMultipartUploadCommand, UploadPartCommand, CompleteMultipartUploadCommand } from '@aws-sdk/client-s3';

async function initiateMultipartUpload(fileName: string, fileType: string, userId: string) {
  const objectKey = `uploads/${userId}/${uuidv4()}/${fileName}`;

  const command = new CreateMultipartUploadCommand({
    Bucket: BUCKET_NAME,
    Key: objectKey,
    ContentType: fileType,
    Metadata: {
      userId: userId.toString(),
      originalFileName: fileName,
    },
  });

  const { UploadId } = await s3Client.send(command);
  return { uploadId: UploadId, objectKey };
}

async function generatePresignedPartUrl(
  objectKey: string,
  uploadId: string,
  partNumber: number
) {
  const command = new UploadPartCommand({
    Bucket: BUCKET_NAME,
    Key: objectKey,
    UploadId: uploadId,
    PartNumber: partNumber,
  });

  return await getSignedUrl(s3Client, command, { expiresIn: 3600 });
}

async function completeMultipartUpload(
  objectKey: string,
  uploadId: string,
  parts: Array<{ ETag: string; PartNumber: number }>
) {
  const command = new CompleteMultipartUploadCommand({
    Bucket: BUCKET_NAME,
    Key: objectKey,
    UploadId: uploadId,
    MultipartUpload: { Parts: parts },
  });

  return await s3Client.send(command);
}
Post-Upload Processing with Webhooks
Set up S3 event notifications to trigger post-processing automatically:
// AWS Lambda function triggered by S3 upload
import { S3Event, S3Handler } from 'aws-lambda';
import sharp from 'sharp'; // Image processing
import { S3Client, GetObjectCommand, PutObjectCommand } from '@aws-sdk/client-s3';

export const handler: S3Handler = async (event: S3Event) => {
  const s3Client = new S3Client({ region: process.env.AWS_REGION });

  for (const record of event.Records) {
    const bucket = record.s3.bucket.name;
    const key = record.s3.object.key;

    // Only process files in uploads/ directory
    if (!key.startsWith('uploads/')) continue;

    try {
      // Download the uploaded file
      const getObjectResponse = await s3Client.send(
        new GetObjectCommand({ Bucket: bucket, Key: key })
      );

      const fileBuffer = await streamToBuffer(getObjectResponse.Body);

      // Process image (resize, generate thumbnails)
      if (key.match(/\.(jpg|jpeg|png)$/i)) {
        const thumbnail = await sharp(fileBuffer)
          .resize(200, 200, { fit: 'inside' })
          .toBuffer();

        const medium = await sharp(fileBuffer)
          .resize(800, 800, { fit: 'inside' })
          .toBuffer();

        // Upload processed images
        await Promise.all([
          s3Client.send(new PutObjectCommand({
            Bucket: bucket,
            Key: key.replace(/\.(jpg|jpeg|png)$/i, '_thumb.$1'),
            Body: thumbnail,
            ContentType: 'image/jpeg',
          })),
          s3Client.send(new PutObjectCommand({
            Bucket: bucket,
            Key: key.replace(/\.(jpg|jpeg|png)$/i, '_medium.$1'),
            Body: medium,
            ContentType: 'image/jpeg',
          })),
        ]);
      }

      // Update database with file metadata
      await updateFileMetadata(key, {
        processed: true,
        processedAt: new Date().toISOString(),
      });

    } catch (error) {
      console.error(`Error processing ${key}:`, error);
      // Send to dead letter queue for retry
    }
  }
};
Best Practices for Production Implementation
To maximize the benefits of presigned URLs, follow these best practices:
1. Security Best Practices
// Environment-based configuration
const UPLOAD_CONFIG = {
  MAX_FILE_SIZE: parseInt(process.env.MAX_FILE_SIZE || '10485760'), // 10MB
  ALLOWED_MIME_TYPES: process.env.ALLOWED_MIME_TYPES?.split(',') || [
    'image/jpeg',
    'image/png',
    'application/pdf'
  ],
  PRESIGNED_URL_EXPIRY: parseInt(process.env.PRESIGNED_URL_EXPIRY || '900'), // 15 min
  RATE_LIMIT_PER_USER: parseInt(process.env.RATE_LIMIT_PER_USER || '10'),
};

// Validate file content (not just extension)
import fileType from 'file-type';

async function validateFileContent(buffer: Buffer, expectedMimeType: string) {
  const detectedType = await fileType.fromBuffer(buffer);

  if (!detectedType || detectedType.mime !== expectedMimeType) {
    throw new Error('File content does not match declared type');
  }

  return true;
}

// Use IAM roles with least privilege
// AWS IAM policy example:
{
  "Version": "2012-10-17",
  "Statement": [
    {
      "Effect": "Allow",
      "Action": [
        "s3:PutObject",
        "s3:PutObjectAcl"
      ],
      "Resource": "arn:aws:s3:::your-bucket/uploads/*",
      "Condition": {
        "StringEquals": {
          "s3:x-amz-server-side-encryption": "AES256"
        }
      }
    }
  ]
}
2. Monitoring and Logging
// Comprehensive logging
import winston from 'winston';

const logger = winston.createLogger({
  level: 'info',
  format: winston.format.json(),
  transports: [
    new winston.transports.File({ filename: 'upload-errors.log', level: 'error' }),
    new winston.transports.File({ filename: 'upload.log' }),
  ],
});

// Log all upload attempts
app.post('/api/upload/generate-url', async (req, res) => {
  const startTime = Date.now();
  const userId = req.user?.id;
  const { fileName, fileSize } = req.body;

  try {
    // ... generate presigned URL ...

    logger.info('Presigned URL generated', {
      userId,
      fileName,
      fileSize,
      objectKey,
      duration: Date.now() - startTime,
      ip: req.ip,
    });

    res.json({ presignedUrl, objectKey });
  } catch (error) {
    logger.error('Failed to generate presigned URL', {
      userId,
      fileName,
      error: error.message,
      stack: error.stack,
    });
    throw error;
  }
});

// Track upload metrics
import { Counter, Histogram } from 'prom-client';

const uploadCounter = new Counter({
  name: 'presigned_url_generated_total',
  help: 'Total number of presigned URLs generated',
  labelNames: ['user_id', 'file_type'],
});

const uploadSizeHistogram = new Histogram({
  name: 'upload_file_size_bytes',
  help: 'Size of uploaded files',
  buckets: [1024, 10240, 102400, 1048576, 10485760], // 1KB to 10MB
});
3. Testing Your Implementation
// Jest test example
import { generatePresignedUrl } from './upload-service';
import { S3Client } from '@aws-sdk/client-s3';

jest.mock('@aws-sdk/client-s3');

describe('Presigned URL Generation', () => {
  it('should generate valid presigned URL', async () => {
    const url = await generatePresignedUrl({
      fileName: 'test.jpg',
      fileType: 'image/jpeg',
      fileSize: 1024,
      userId: '123',
    });

    expect(url).toMatch(/^https:\/\/.*\.s3\.amazonaws\.com\/.*\?.*$/);
    expect(url).toContain('X-Amz-Signature');
  });

  it('should reject files exceeding size limit', async () => {
    await expect(
      generatePresignedUrl({
        fileName: 'large.jpg',
        fileType: 'image/jpeg',
        fileSize: 100 * 1024 * 1024, // 100MB
        userId: '123',
      })
    ).rejects.toThrow('File size exceeds limit');
  });

  it('should reject unauthorized users', async () => {
    await expect(
      generatePresignedUrl({
        fileName: 'test.jpg',
        fileType: 'image/jpeg',
        fileSize: 1024,
        userId: null,
      })
    ).rejects.toThrow('Unauthorized');
  });
});
What Big Players Are Using
The use of presigned URLs (or similar direct-to-storage upload mechanisms) is an industry standard among major web companies that handle massive amounts of user-generated content:
Netflix: Uses a highly distributed architecture for its content ingestion, which includes direct uploads to cloud storage for large media files.
Dropbox/Google Drive/OneDrive: When you upload a file to these services, especially through their web interface, the file is often streamed directly to their underlying cloud storage infrastructure. While not always explicitly "presigned URLs" in the traditional sense for internal apps, the principle of direct client-to-storage upload, bypassing application servers, is fundamental to their design.
Instagram/Facebook: When you upload photos or videos, these are typically sent directly to their massive content delivery networks and storage systems, not routed through their main API servers.
YouTube: Video uploads are a prime example of direct-to-storage uploads, allowing users to efficiently transfer large video files without bogging down YouTube's core application servers.
These companies prioritize security, performance, and scalability above all else, and direct-to-storage uploads are a cornerstone of their file handling strategies.
Quick Reference: Implementation Checklist
Before Going to Production:
- ✅ Set up IAM roles with least privilege access
- ✅ Configure CORS policies for your S3 bucket
- ✅ Enable S3 server-side encryption (SSE)
- ✅ Set up CloudWatch alarms for failed uploads
- ✅ Implement rate limiting on presigned URL generation
- ✅ Add file content validation (not just MIME type)
- ✅ Set up S3 lifecycle policies for old uploads
- ✅ Configure S3 event notifications for post-processing
- ✅ Test error handling for expired URLs
- ✅ Monitor upload success rates and latency
Common Implementation Patterns
Pattern 1: Simple Single File Upload
Best for: Profile pictures, document uploads, small files (<5MB)
- Generate presigned URL with 15-minute expiry
- Client uploads directly to S3
- Backend notified via webhook or client callback
Pattern 2: Multipart Upload
Best for: Large files (>5MB), videos, high-resolution images
- Initiate multipart upload
- Generate presigned URLs for each part
- Client uploads parts in parallel
- Complete multipart upload on backend
Pattern 3: Resumable Uploads
Best for: Unreliable networks, mobile apps, very large files
- Store upload state in database
- Allow clients to resume from last successful part
- Implement chunk-based upload with progress tracking
Conclusion
While direct API uploads might seem convenient initially, their inherent security risks, performance limitations, and scalability challenges make them an unsustainable solution for any application beyond the most trivial use cases. Presigned upload URLs offer a powerful, secure, and efficient alternative that offloads the burden of file transfer to specialized cloud storage services, allowing your backend API to focus on its core responsibilities.
By implementing presigned URLs with the code examples and patterns provided in this guide, you can build robust, scalable, and secure applications that seamlessly handle user-generated content. The implementation examples in Node.js, Python, and React demonstrate that this pattern works across different technology stacks, making it accessible to developers regardless of their preferred language or framework.
Remember: security, performance, and scalability aren't optional, they're essential. Start implementing presigned URLs today and give your users a superior experience while protecting your infrastructure.